


Spooky, No Fondant Chocolate Cupcakes: Two Ways to Style Your Halloween Bakes

There is a distinct magic that happens in the kitchen when the weather turns crisp, the leaves begin to carpet the ground, and the evenings draw in a little earlier. For me, autumn baking isn't just about the final treat—it’s about the ritual. It’s the steady hum of the mixer, the aroma of rich cocoa filling the house, and the quiet satisfaction of turning a handful of ordinary ingredients into something memorable.
With Halloween just around the corner, I wanted to create a gluten free holiday treat that captures the whimsical and dramatic spirit of the season without relying on store-bought shortcuts.
Enter the ultimate spooky dark chocolate cupcake
Many elaborate Halloween recipes rely heavily on sheets of sugary fondant to achieve their look. But let's be honest: fondant might look clean on camera, but nobody actually wants to eat it. Instead, this recipe embraces the raw, comforting texture of real, fluffy buttercream, crushed cookies, and simple piping techniques.
Whether you want to lean into a bright, playful storybook look or a moody, old-world aesthetic, this one base recipe has you covered with two entirely fondant-free styling directions.

The Secret to the Deepest Chocolate Flavor
Before we get to the decorating, we have to talk about the foundation. A great cupcake should never just be a vehicle for frosting; the cake itself needs to hold its own.
This chocolate batter is incredibly forgiving, producing a beautifully moist, tender crumb every single time. To elevate it from standard chocolate to a deeply dark, gothic dessert, I use two quick baker's secrets:
A Touch of Coffee: Adding a teaspoon of espresso powder to the warm liquid doesn't make the cupcakes taste like coffee. Instead, it acts as a flavor amplifier, making the cocoa powder taste twice as rich and intense.
Black Cocoa Powder (Optional): If you want a naturally pitch-black cupcake that looks like midnight without using artificial food coloring, swap half of your standard cocoa powder for Dutch-processed black cocoa powder (the same kind used to make Oreo cookies!).

The Base Recipe
Prep time: 20 minutes
Cook time: 15–18 minutes
Yield: 12–14 cupcakes
Ingredients for the Chocolate Cupcakes:
1 ½ gluten free cups all-purpose flour
1 cup sugar (granulated or organic cane sugar)
½ cup good-quality unsweetened cocoa powder
1 tsp baking soda
½ tsp baking powder
½ tsp salt
½ cup water
½ cup milk (or unsweetened coconut milk)
⅓ cup vegetable or sunflower seed oil
1 tbsp white distilled vinegar or apple cider vinegar
1 tsp pure vanilla extract
1 tsp espresso powder (dissolved directly into the water)
Ingredients for the Fluffy Vanilla & Chocolate Buttercream:
1 cup unsalted butter, softened to room temperature
3 to 4 cups powdered sugar, sifted
2 tsp pure vanilla extract
2–3 tbsp heavy cream or whole milk
⅓ cup extra cocoa powder (reserved to transform half the batch into chocolate frosting)
Step-by-Step Instructions
1. Bake the Cupcakes
Preheat your oven to 350°F (175°C) and line a 12-cup muffin tin with dark paper cupcake liners.
Whisk the dry ingredients: In a large bowl, sift together the flour, sugar, cocoa powder, baking soda, baking powder, and salt until completely combined.
Mix the wet ingredients: In a separate bowl or measuring jug, stir together the water (with the dissolved espresso powder), milk, vegetable oil, vinegar, and vanilla extract.
Combine: Slowly pour the wet mixture into your dry ingredients. Whisk gently for about 1 minute until the batter is smooth, elegant, and completely free of lumps.
Bake: Divide the batter evenly among the cupcake liners, filling each roughly 2/3 to 3/4 full. Bake for 15 to 18 minutes. Test the center with a toothpick; if it comes out clean, they are ready. Transfer them to a wire rack to cool completely before decorating.
2. Whip the Custom Buttercream
In a stand mixer fitted with the paddle attachment (or using a hand mixer), beat the softened butter on medium-high speed for a full 2 minutes until it becomes completely smooth, pale, and creamy.
Gradually add your sifted powdered sugar one cup at a time, alternating with small splashes of the heavy cream and the vanilla extract.
Once incorporated, turn the mixer to high speed for another 2–3 minutes until the frosting forms stiff, fluffy peaks.
To create two colors: Split the frosting evenly into two bowls. Keep one bowl bright white for your ghosts. Fold the remaining ⅓ cup of cocoa powder (and an extra teaspoon of cream if it feels too thick) into the second bowl to create a rich chocolate frosting.

Choose Your Aesthetic: Two Fondant-Free Layouts
Now comes the creative part. Depending on the mood of your kitchen or your upcoming Halloween gathering, pick the design style that speaks to you:
|  Aesthetic A: The Whimsical Ghost |   Aesthetic B: The Moody Dark      |               Nook                |     Academia Graveyard  |
+====================================+============================+
| * White vanilla buttercream       | * Chocolate buttercream base       | * Tall, smooth piped domes        | * Crushed Oreo cookie "soil"       | * Mini chocolate chip details     | * Milano cookie "tombstones"       | * Bright, sweet, and playful      | * Old-world & immersive

+------------------------------------+---------------------------+
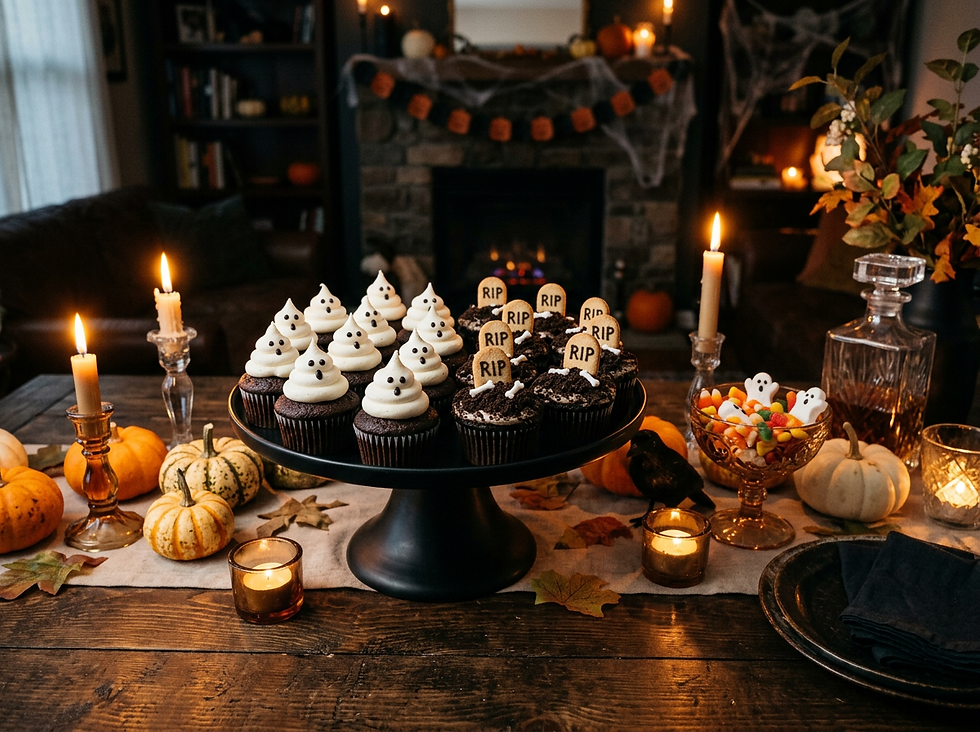
Direction A: The Whimsical Ghost Nook 👻
This style is bright, playful, and completely charming. It relies on a clean, stark contrast between the dark cupcake liner and a towering peak of white frosting.
The Technique: Fit a piping bag with a large, plain round piping tip and fill it with your bright white vanilla buttercream.
The Build: Hold the piping bag completely vertical, about a half-inch directly above the center of a cooled cupcake. Squeeze firmly without moving the bag, letting the frosting build up into a tall, smooth dome. Slowly pull the bag upwards while releasing pressure to create a perfect, spectral peak at the very top.
The Finishing Touches: Press three mini chocolate chips directly into the buttercream (points facing inward) to give each ghost two expressive eyes and a tiny, shocked mouth. You can also use a fine tube of black writing icing for custom expressions!
Direction B: The Moody Dark Academia Graveyard 🪦
If you prefer a style that feels historic, slightly gothic, and texturally rich, this miniature graveyard layout is the perfect choice.
The Technique: Pipe or spread a classic, generous swirl of your chocolate buttercream onto the cooled cupcakes.
The Build: Separate 8–10 Oreo cookies, scrape out the cream, and place the chocolate wafers into a zip-top bag. Crush them with a rolling pin into a fine, uneven dust. Dip the frosted tops of your cupcakes directly into the cookie crumbs, coating them completely to create realistic, dark "graveyard soil."
The Finishing Touches: Take a few flat, oval biscuits (like Milano cookies). Using melted dark chocolate or a fine black decorating pen, neatly write "RIP" across the top half of each cookie. Slice a tiny, shallow slit into the top of the cupcake, slide the cookie tombstone securely into place, and tuck a mini gummy worm or a sprig of mint into the soil for a beautifully eerie finish.
Embracing the Beauty of Imperfection
As we’ve talked about before on this blog, real creativity isn't always perfectly neat. When you are piping your ghosts or stamping your tiny tombstones, don't worry if they lean a bit to the side or look slightly asymmetrical. Sometimes the crack is where the truth gets through. An imperfect, expressive buttercream ghost carries a hundred times more soul and character on a camera lens than a sterile, factory-molded piece of fondant ever could.
Baking should feel like an escape—a small space in your week where you can slow down, step out of the daily rush, and enjoy the texture of the moment. Set up your station, turn on your favorite atmospheric playlist, put a warm fall fragrance on your plugin candle warmer, and just enjoy the process.




Comments